https://tutorials-raspberrypi.com/digital-raspberry-pi-scale-weight-sensor-hx711/
https://github.com/gandalf15/HX711
Build a digital Raspberry Pi Scale (with Weight Sensor HX711)
As hardly any scales work analogously, it is of course also possible to measure weights with a digital Raspberry Pi scale. This can be used in various applications as the weight value ranges which can be measured are also almost unlimited. Only a sensor and a load cell are required, which are available for different weight ranges.
In this tutorial we are building a simple Raspberry Pi kitchen scale, whose precision is amazingly accurate. Of course, it is also possible to unscrew an existing (person) scale and read it out using a Raspberry Pi.
Accessories for the Raspberry Pi Scale
The most important thing to build your own scale is a “load cell”, which is a metal bar with a hole in the center (see picture on the right). This is available for different weight classes (up to 1kg, up to 5kg, up to 50kg, etc.). Even though some have a different form, all are provided with four cables. To read out the values, the HX711 weight sensor is also required. This sensor is available in two versions: red and green. The pressure sensors probably have small differences, but are – theoretically – both compatible. I have used the green HX711. Fixing material is also required.
In summary, the required components are:
- Load Cell (US / UK)
- Green HX711 (US / UK)
- Breadboard
- Jumper wire
- Two boards (the boards should not bend easily, therefore the best is not too thin plywood)
- Longer bolts + matching nuts
Alternatively, you can also take an existing person or kitchen scale and unscrew it. In any cases, a load cell is available and sometimes also a HX711 weighting sensor. With this you could start directly. Since complete scales cost only slightly more than the load cells, this is definitely worth considering.
If someone has screwed his scale and both are present, I would be pleased about a comment with name / manufacturer of the balance.
Raspberry Pi Scale – Assembling
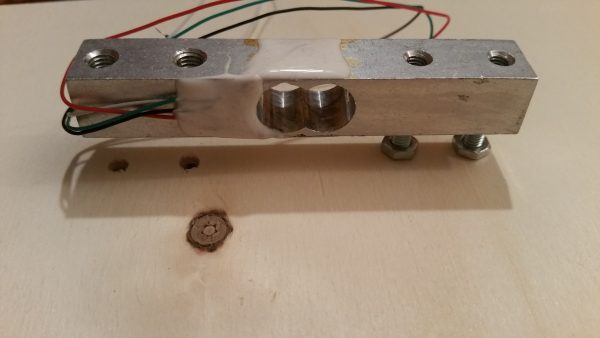
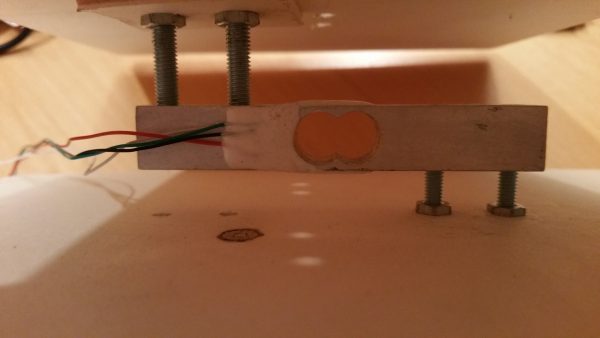
Before the load cell is connected to the HX711 weight sensor, it should be mounted on the two plates. For this I made markings with a ballpoint pen on the wooden boards, where the screws come in. With a drill I drilled the holes and inserted the screws. Between the screw and the load cell, there should be a nut, which serves as a protection to the board (see pictures).
The nuts should be well tightened so that the screws do not slip off the board.
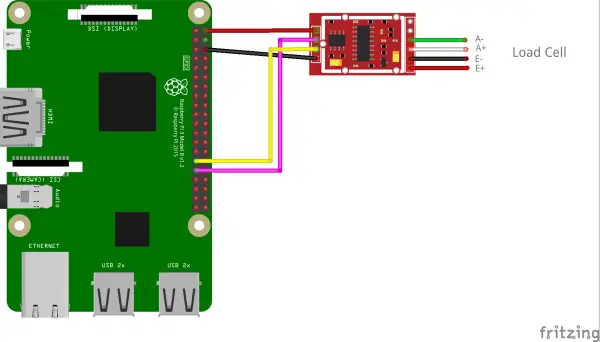
If the construction is complete, we can go to the HX711. The four cables of the Load Cell must be connected to the weight sensor. The green HX711, however, has six connections, of which we only need four for the cables. The connection is as follows:
- Red: E+
- Black: E-
- Green: A-
- White: A+
The pins labeled B+/B- remain empty. Apparently there are versions of the sensor. Where the pins are labeled S+/S- instead of A+/A-.
Now you just have to connect the sensor to the Raspberry Pi. Since this also has only four connections, the wiring is quite simple:
- VCC to Raspberry Pi Pin 2 (5V)
- GND to Raspberry Pi Pin 6 (GND)
- DT to Raspberry Pi Pin 29 (GPIO 5)
- SCK to Raspberry Pi Pin 31 (GPIO 6)
Schematically, the connection to a Raspberry Pi 3 then looks as follows:
Of course, you can also change the pin assignments of DT and SCK, e.g. If you have an older model. However, you have to adjust the corresponding pins then synonymous in the code.
Raspberry Pi Weight Sensor Software
To measure the weight and to read out the value we use a Python library. Although there are corresponding C ++ libraries, however, I have no good experience with that. First, we will clone the project:
git clone https://github.com/tatobari/hx711py
It contains an example.py file which shows the function of the library and can also be used. Before that, however, a few adjustments are necessary.
First we will edit this file:
cd hx711py
sudo nano example.py
We are looking for the line in which the reference unit is set and comment it out with a hashtag sign, so that the line looks as follows:
Save it with CTRL+O and exit with CTRL+X. This reference unit is the divisor, but we must first find it out in the next step. Meanwhile you can run the example (abort with CTRL+C). The values should appear in the range 0 to 200, but this is not important at this point.
sudo python example.py
First Test of our Raspberry Pi Scale
The correct calibration of the weight sensor and the Raspberry Pi balance is crucial. For this we need a comparison object whose weight we know. For example, I have taken two packs of rice (1kg each), since it is recommended to choose an average value of the maximum (my load cell could be used up to 5 kilograms). Place it on the scale and run it again with sudo python example.py. The displayed values can be positive as well as negative. In my case were displayed at 2kg (= 2000 gramm) values around -882000. My reference value is thus -882000 ÷ 2000 = -441.
We then edit the sample file in the same way as above descirbed, remove the comment hashtag and enter this value accordingly. My line now looks as follows:
After saving and starting the file, the weights should now be displayed as shown in the following video. Since I had the problem that sometimes values below 0 slipped and this should not be possible, I have extended the line, in which the value is read out. This displays no longer negative weights.
In my tests I took a load cell with up to 5kg and calibrated with 2kg. As seen in the video, the measurement is astonishingly accurate. It is important, however, to ensure that the mounted plate does not bend too much (especially the floor plate must be fixed). However, you should be aware that the values outside the range (e.g. above 5kg) will no longer be accurate – a different load cell with its own calibration is required.
How to show text on a LCD display, I have described in this tutorial and in the video also used.
'언어 > 라즈베리파이' 카테고리의 다른 글
| firebird 3 server core 설치 (0) | 2018.09.02 |
|---|---|
| 리눅스에서 폰트설치 (0) | 2018.09.01 |
| Raspberry Pi 3에 opencv_contrib 포함하여 OpenCV 3.4.1 설치하는 방법 (0) | 2018.08.29 |
| 라즈베리파이에 여러개의 시리얼 포트가 필요할 때 (0) | 2018.08.27 |
| 시리얼통신 관련 TLazSerial (0) | 2018.08.27 |
